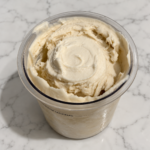
Banana Pudding Ninja Creami (No Protein Powder)
This Banana Pudding Ninja Creami is creamy, fruity, and packed with banana pudding flavor. Made without protein powder, the entire pint has 226 calories and 20 grams of protein.
Servings: 1 pint
Calories: 226kcal
Cost: $1.95
Equipment
- 1 Ninja Creami
- 1 Ninja Creami Pint
- 1 Immersion Blender recommended for easy blending; a regular blender, handheld milk frother, or shaker cup can also work.
Ingredients
- 355 g Kroger Carbmaster Fat Free Milk 1½ cups; Fairlife Fat Free Ultra-Filtered Milk can be substituted
- 100 g Fresh Banana fresh, around 1 medium banana, use a ripe banana. Frozen banana can be substituted
- 24 g Monk fruit sweetener or other zero calorie sweetener about 2 tbsp; another zero-calorie granulated sweetener can be substituted
- 6 g Jell-O Zero Sugar Banana Cream Instant Pudding & Pie Filling 1 serving, another banana cream pudding mix can be substituted
- 1 g Salt about ¼ tsp
Instructions
- Blend the base: Add the milk, banana, sweetener, pudding mix, and salt to the Ninja Creami pint. Use an immersion blender to blend for about 30–60 seconds, until the fruit is smooth, the ingredients are fully combined, and no clumps remain. A regular blender can also work well. A handheld milk frother or shaker cup is not recommended because it may not break down the fruit adequately.
- Freeze: Make sure the liquid mixture is below the max fill line. Place the pint on a level surface and freeze for at least 24 hours. Freeze with the lid removed to help prevent a bump from forming.
- Prepare to spin: Remove the pint from the freezer and make sure the frozen surface is level, with no raised bump. Run hot water over the outside of the pint for about 1 minute or let it sit on the counter for about 15 minutes.
- Spin: Process using the Lite Ice Cream setting.
- Assess the texture: After the Lite Ice Cream cycle, check the texture. If it still needs significant processing, run a Re-Spin. If it’s already close to the texture you like, you can skip the Re-Spin and run the Mix-In cycle instead, whether or not you’re actually adding mix-ins.
- Add mix-ins or enjoy: Enjoy as-is, or make a hole slightly off-center with a butter knife, add your mix-ins, and run the Mix-In cycle. Add any toppings after processing.
Notes
Nutrition per pint: 226 calories | 20 g protein | 38 g carbs | 0 g fat
Nutrition & cost: Nutrition is calculated for the entire pint using the specific ingredients listed. Ingredient costs are estimates based on representative prices. Substitutions may change both nutrition and cost, and actual prices will vary by store and location.
Milk: I use Kroger Carbmaster Fat Free Milk for its high protein content and low calories. Fairlife Fat Free Ultra-Filtered Milk can be substituted 1:1. Nutrition and cost will vary depending on the milk used.
Banana: I use fresh banana for the banana flavor. Frozen banana can also be used, but the final flavor, texture, nutrition, and cost may vary.
Sweetener: I use Monk Fruit In The Raw to add sweetness without adding significant calories. You can substitute another zero-calorie granulated sweetener, but sweetness may vary depending on the product.
Pudding mix: Jell-O Zero Sugar Banana Cream Instant Pudding & Pie Filling adds banana cream flavor and helps thicken the base for a smoother texture after processing. I use 6 grams of pudding mix in place of xanthan gum.
Salt: A small amount of salt helps balance the sweetness and bring out the banana pudding flavor. I use 1 gram, or about ¼ teaspoon, as a consistent starting point. You can adjust the amount to taste.
Blending: I recommend an immersion blender because it is quick, easy to clean, and helps combine the ingredients evenly. A regular blender can also work well. A handheld milk frother or shaker cup may help combine the liquid ingredients, but a blender or immersion blender is recommended for breaking down the banana. Make sure the banana is smooth and all ingredients are fully combined before freezing.
Max fill: Make sure the blended mixture stays below the MAX FILL line before freezing. A small amount of foam above the line is okay, provided the actual liquid mixture stays below it once the foam settles. If the mixture exceeds the line, reduce the ingredient amounts proportionally before freezing.
Freezing: Freeze time can vary depending on your freezer temperature, but I recommend freezing the pint for 24 hours to be safe and help ensure it is fully frozen before processing. Freeze the pint on a level surface. Before processing, make sure the frozen surface is level and does not have a raised bump. Do not process a pint with a significantly uneven frozen surface.
Processing: If the ice cream is especially dry or powdery after the first spin, try a Re-Spin before adding liquid. If it still needs additional moisture, add a small splash of water before another Re-Spin. Avoid adding too much liquid at once, as it can make the finished ice cream softer than intended.
Icy sides: A thin icy layer around the sides of the pint after the first spin is normal because the blade does not reach the very edge of the container. Avoid scraping the icy sides into the creamy center before running another cycle. Once you're finished processing, you can push the icy layer toward the bottom so it softens while you eat from the top. Another option is to enjoy the creamy center first and let the icy sides soften as you eat.
Leftovers: If you do not finish the entire pint, smooth the remaining ice cream into a level surface, replace the lid, and return it to the freezer. When you're ready to enjoy the leftovers, allow them to soften slightly or process them again using the appropriate setting for your Ninja Creami model if needed. Keep in mind that additional processing may further break down any mix-ins.
Nutrition
Calories: 226kcal | Carbohydrates: 38g | Protein: 20g